Fall Essentials: Shoes


SHOP:


This is my second post in the Fall Essentials series! If you missed the last one, you can check out lots of my favorite fall decor here. One of my favorite things about fall is, of course, the boot weather that comes with it. In fall it's fun to get out your boots and plan cozy outfits. (I wish I could say the same about winter in Michigan, but really, it's not that fun after the first week or so ;)) 

The 3 types of shoes are essential for fall is a pair of flats, booties and tall boots. You can mix and match so many outfits with those choices! These gray boots are so awesome, they might just make my birthday wish list! I also love the light colored, quilted booties-- I could see myself wearing them with cuffed jeans and a casual sweater.

What boots are you excited to pull out this year?
xoxo
Photobucket
1

In the Kitchen: Peach Cobbler Recipe


Hope you all had great weekends! Last night we headed out to the beach to see the Blood Moon! Did you see it??

Since the first official day of Fall was last week, I thought it'd be a fun time to share with you one of my favorite dessert recipes: peach cobbler. I think this recipe was my grandma's and then she passed it to my mom, and now it's one of my family's very favorites. When I was home visiting my parents a few weeks ago I somehow managed to get my mom to make the cobbler twice. It was delicious :) I hope you love it!!

Ingredients: 1 29 oz can peaches OR 6-7 good sized fresh peaches, 1 stick butter, 1 cup flour, 1 cup sugar, 3/4 cup milk, 1-1/2 tsp. baking power.

Directions:

- Melt butter pats in pyrex pan while preheating. Set a timer for 2 minutes so it doesn’t burn! (We usually use a 9×13″ or a little smaller)

- Mix flour, sugar, milk and baking powder together with spoon. I always add a dash of cinnamon for good measure  ;)

- If you’re using fresh peaches, peel them and slice. Throw in skillet and combine 1/4 cup sugar and a few sprinkles of cinnamon. Let them simmer for 5-10 minutes until juices flow. (If you’re using a can of peaches, you don’t need to do this. They’re already very sweet!)

- Pour your batter into the pyrex directly over the batter. Do not spread evenly or touch with a spoon once it’s in the pan. Try to drizzle the batter in evenly.

- Arrange peaches to cover your dough. Make sure the peaches and ALL the juice ends up in the baking pyrex.

- Bake at 375 for 40 minutes. Check at 30 min and add a sprinkle of cinnamon to the top if wanted.

- Let stand for 10-15 to cool, then serve with vanilla ice cream.

Enjoy!

Happy Monday!
xoxo
Photobucket
1

Friday Finds: 30% & 40% off sales!


Happy Friday everyone! There are a few great sales happening today and this weekend, so it's time for Friday Finds!

1. 40% off everything at LOFT. This is one of my favorite store for basics! They have some great things for Fall. Use code FALL40 for your discount at checkout.


2. 30% off SALE items at Anthropologie. Use code XTRAXTRA at checkout!


That sweater with the white tank coming down out of it is SO cute. I might just need it for fall!

Have a great weekend! I'll be going to my first Michigan football game...can't wait! You can follow along on Instagram if you'd like :)


Photobucket
0

DIY Gold Leaf White Pumpkins


Happy first day of Fall! (How did this happen?!) Last week I decided I needed some festive fall decor in my apartment, so I went to the craft store and decided to make some white and gold pumpkins. It turned out pretty cute (I think!) so I wanted to share what I did here with you.

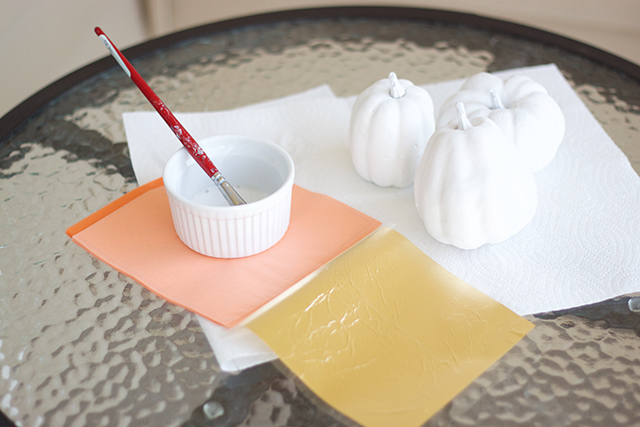
Materials: A bunch of pumpkins from the craft store ($6), white chalk spray paint ($7), gold foil paper ($10, but only used one sheet for this project!), tacky glue ($2, but already had mine)

Step 1: lay out a box or a drop cloth and spray your pumpkins white using a chalk paint. I love the matte, chalky finish this gives the pumpkins. They're casual and farmhouse looking, which I love. I did 2-3 coats to get them fully covered and kept rotating the pumpkins in between coats to make sure I didn't miss any spots.


Step 2: After the pumpkins are totally dry, I put a little bit of Tacky Glue in a ramekin an mixed it with a tiny bit of water to water it down a little. 


Step 3: Using a paint brush, I lightly brushed the pumpkin with the water/glue mixture. (I watered it down a little so that there wouldn't be clumps of glue. The gold foil is sort of flaky and hard to work with, so didn't want to make it worse with tons of glue everywhere!)


Step 4: After brushing on the glue, I kept the gold foil on the paper it came on and pressed it onto the pumpkin. The gold foil will usually just stick to the parts with the glue. I also found my self peeling off small parts of the gold foil and applying it myself to areas I thought could use more. 


This is what it looks like! I only did 3 of my 7 pumpkins with gold foiling, which I think is a fun and special touch.


They're sitting in a gold bowl/platter on my bookshelf.

DETAILS | BookshelfMercury Glass Owl / Art was a DIY / Gold Vase (similar) / Decorating books / Seaglass Vases / Bookends / Gold Bowl for pumpkins / Similar & sign


This was a fun little project to say "Welcome, Autumn!"

Happy Wednesday!
xoxo

Photobucket
2

La Petite Bloom


Andrea Pesce Photography 

Today I will be teaching at our final Michigan La Petite Bloom Workshop for the year. We're so excited to meet everyone who is on their way to the workshop and spend the day learning how to do floral arrangements and calligraphy. Follow along on Instagram to keep up with the happenings!

We have one more La Petite Bloom Workshop left this year (our last event of the year!) Chicago, IL on December 2nd at Brique Chicago. To say we're excited is an understatement! Just take a look at this venue...


We'll be learning graphic design and branding from Lauren of Elle & Co. and calligraphy from Alyssa of Parris Chic Boutique. You can register for the event here! We're already 50% sold out! 

Happy Tuesday! I'll be back with a Fall DIY project tomorrow :)
xoxo
Photobucket
0

Family Room Design Update


Happy Monday! It's a busy week around here as we prepare for our La Petite Bloom Workshop tomorrow in Michigan. I'm always so excited to get to meet the new gals who will come to the workshop!

A few weeks ago I revealed my parent's living and dining room. There's nothing like the feeling of finishing a space for a client (especially when said client is your mom!) and they absolutely love it. I get texts weekly letting me know how much they love their living room. Once we finished the living room and dining room, we moved on to the family room. Last month I showed you the color palette for the room and gave you the scoop on the design plan. Let's recap:

- New sofa
- New window treatments and molding around windows (in progress!)
- New custom pillows
- New coffee table
- New end tables
- New occasional chair (the chair has arrived, but sadly I don't have a picture of it yet!)
- Ottoman for side chair
- Plant for corner
- Art for above sofa (in progress!)
- Fill in weird fireplace in the brick
- New rug  (we got this pretty striped rug from Crate & Barrel


You can see the new large sectional is in with some blue pillows, the coffee table with gold accents is in as well, and we got this adorable globe (for under $30!) to sit atop the table.

As you can see, that big brick wall is still blank. We're working on getting a beautiful custom painting of a beach in Hawaii done, as that's my mom and dad's favorite place in the world :) I can't wait to see it!

We love the new rug from C&B-- it's soft, subtle and give the room a bit of pattern.

We're also currently in the process of getting some cornice boxes made to coordinate with the rest of the colors in the room. The two windows on either side of the TV are long, skinny, and placed really high up on the wall, so they needed a little something. I think this is a great solution! 

We can't wait to show you more progress soon. And the new upholstered chair from Traditionally Derby is to.die.for.

Enjoy your Monday!
xoxo

Photobucket
2

Tabletop Styling Tips with West Elm


Today I'm showing you a little peek at my time speaking at West Elm last Tuesday. West Elm invited me to the Junior League of Grand Rapids event to style a tablescape and teach the ladies a few things about putting together a holiday table.


I started with the Emmerson Dining Table:


First I put down the Embroidered Dot Table Runner. Instead of only doing one charger, I went with two to dress it up a bit more. Then I layered with white textured plates. Since metallics are so in AND very holiday, I mixed metals. A silver charger, champagne colored second charger and gold flatware all work well together.


I absolutely love these dark charcoal napkins! Tied with a silver or gold napkin ring (I alternated them) really made the color come alive. I finished the napkins with sprig of the same greenery that was in the arrangements on the table.


The gorgeous vases were one of my favorite things about the tablescape. You know you can mix metals when both silver and gold are on the same vessel! I was also obsessed with the the gold rimed drinking glasses and the tiny little coupe glasses.


Here are more of my favorite tabletop items:


Want in on the tips I shared at the event?! Well, you're in luck :) 

1. Start with a clean slate.

2. Pick out your chargers and dishes based on an inspiration for the gathering. Maybe you have a color story, a holiday, theme, monochromatic look, mixing metals, etc.

3. When decorating any part of your home, remember to layer. Layering gives the “collected over time” look that yields an inviting, cohesive look. Combining old pieces with the new, layering textures, objects, and live plants are all great ways to bring the look to life. For the dining table we are going to layer a charger, dinner plate and salad plate, and then set the napkin on top. 

4. Adding personal details, like name place cards, is always a nice touch.
5. Utilize different heights throughout the tablescape. You can do this in stacking dishes, the centerpieces, etc.

6. Bring something fresh to the mix. Putting together a simple arrangement of flowers for your centerpiece brings life to the table. Other thoughtful elements would be giving each place setting their own bud vase with a flower or sprig of greenery. If you want to switch it up and forgo the flower look, try a centerpiece of fresh fruit.

7. Set the mood and ambiance for the gathering with the appropriate lighting. Whether this is through dimming your overhead lighting or lighting a few tea lights, this will set the tone for the party.

What a fun event it was with Junior League and West Elm! I was honored to be a part of it.

Have a great weekend!
xoxo
Photobucket
1

Neutral, Traditional Home Tour


Photo credit: VICTORIA PEARSON for House beautiful. Interior design: Barbara Barry

From the second I saw this home, I knew exactly who designed it. Barbara Barry, of course! She has impeccable taste and a recognizable monochromatic style. This is a home I want to take an extended vacation in. How about you?! ;)

From that quaint and inviting outdoor space to the serene blue bedroom and gorgeous neutral living room, I'm all over it. The stunning tailored details each room has, is a signature look of Barbara Barry. One of the ways you can manage to keep the visual appeal of an all neutral or monochromatic palette is adding texture. Lots of it! What's your favorite element in this neutral and traditional home tour?

Happy Wednesday!
xoxo


Photobucket
2

Back to Top